Tutorial: Setup a Ghost Newsletter on AWS as a Substack Clone
You’re stupid if you don’t have a community. At least that’s what the internet keeps telling me.
I’ve been building products and businesses for a decade but I’ve never built a community. Newsletters/communities are valuable because that group follows you wherever you go. Beyond company and product, a loyal audience will reward you many times over (can sell many products to them, create paid content etc).
Over the coming months I’ll write about my attempt to build a paid community from nothing*. If you want, check out my progress at Grit List, my personal growth newsletter. I email you once a week on how to improve your life/self.
This article walks you through how to setup a Ghost blog from scratch on AWS, leveraging there new Membership and Newsletter features.
Now, let’s get started!
*Nothing defined: I currently post to social platforms once every 3 months. I have 642 followers on Twitter. I have a few hundred email addresses from a few products I’ve launched before, but I haven’t yet decided if I’ll use them. I also have 932 followers on Medium, from a series I did 2 years ago…and I haven’t posted in 2 years.
Platform
First step, what tool/medium should I use?
There are a lot of options; Wordpress, Ghost, Substack, and Medium to name a few. You can have a newsletter or a website or both. Options options.
Ultimately, I decided to go with Ghost. Ghost recently released their 3.0 version, which includes the ability to have and maintain members, charge membership fees, and send out newsletters. It’s basically the exact same thing as Substack, except that you are able to control everything yourself, i.e. more effort, more reward.
The best part? If you build it in Ghost then there’s $0 membership fees. While this post is focused setting up Ghost on AWS, you can also simply use Ghost Pro’s platform if you’re not technical and want to pay $36/mo.
Without further ado, I give you my guide on how to setup a Ghost Membership platform on AWS.
Prerequisites
These are some things that I don’t go into, but are needed to complete this tutorial. Most of them are intuitive and straightforward, which is why I didn’t go into them:
- Have an AWS account (needed for hosting)
- Have a Stripe account (needed if you want to paid members)
- Have a custom domain (if you want to set up your custom domain)
- Some familiarity with command line (can work around this, but not covered in this tutorial)
Launching your Instance
To get started, signin/up to AWS and go to this AMI for Ghost. Click:
- “continue to subscribe”
- “continue to configuration”
- “continue to launch”
- If prompted to create a keypair, do it, and download it and save it as
mysite-keypair.pem. We will use this later.
Here you can configure your EC2 Instance Type to be t2.micro instance, which is free for up to 750 hours per month. Free is good! Select that, and leave everything else the same, then click “Launch”.
Once your application finishes launching, you’ll need to get access to your your Ghost installation.
Getting Ghost admin access
- Go to AWS Cloud Console, and open Compute -> EC2
- Select your newly created Instance (under Instances)
- With your Instance checkbox selected, go to Actions>Instance Settings>Get System Log
- Scroll to the bottom and then slowly scroll up until you see a call out section starting with “Setting Bitnami application password…”
- Copy and save your Ghost admin username and password for later
- For more detailed steps, view Option 1 in this tutorial
Log into your Ghost installation
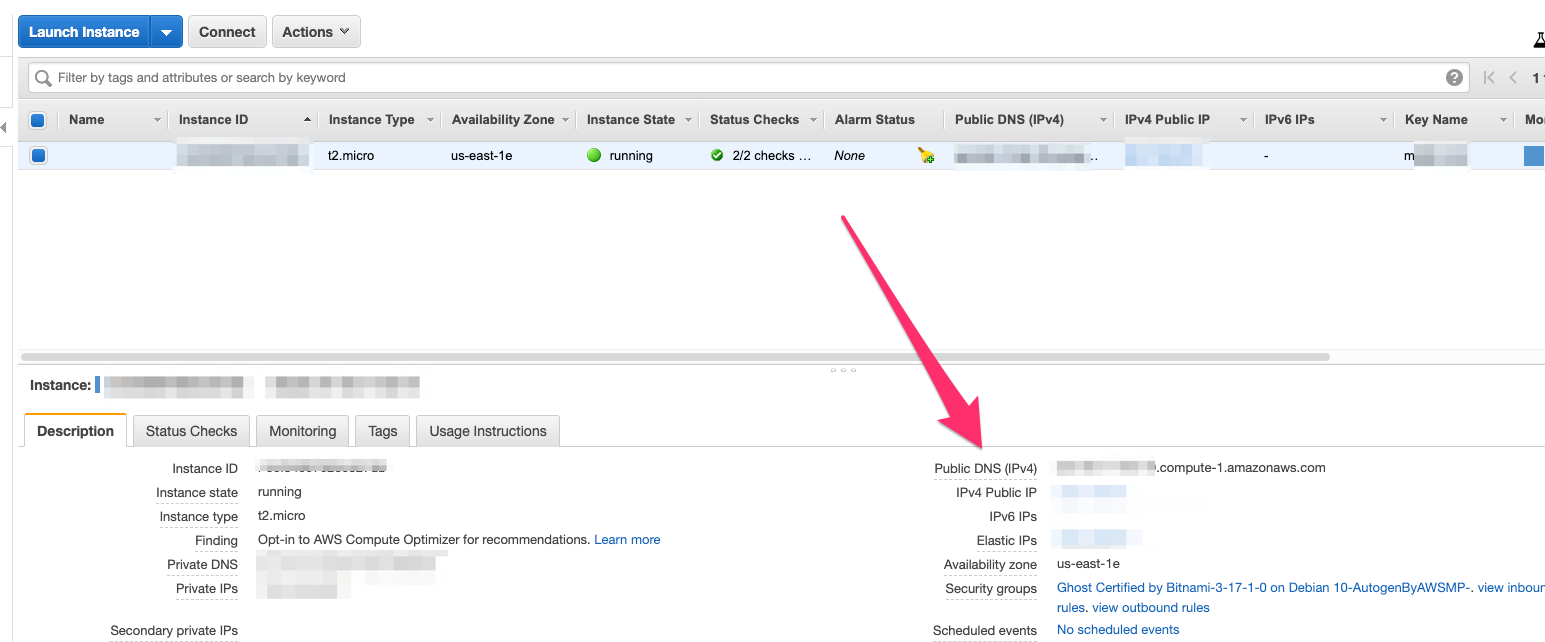
- Within AWS, copy and paste your Instance’s Public DNS. It should look like this:
ec2-50-17-XX-XX.compute-1.amazonaws.com - Go to the URL of your public DNS to confirm your site is running
- Add
/ghostto the end of your URL to view the Ghost Admin page (e.g.ec2-50-17-XX-XX.compute-1.amazonaws.com/ghost) - Log in with the username and password from the Getting Ghost admin access steps
Enable the Ghost membership feature
- Within the Ghost Admin, go to Labs and toggle “Enable Members” (more explicit instructions if needed)
- Fill in your Stripe API keys (can click the link beneath the Stripe input boxes for easy access)
- Enter the cost of your monthly and yearly subscriptions
- If you want to set up a free trial, read how to do so here
- Download a
.zipof a Members enabled theme (default theme link // my forked theme // see my forked theme in action) - Go to Ghost Admin>Design and upload your
.zipof the theme under “Installed Themes” - Activate your theme
- Once the theme is activated, unzip the theme
.zipon your computer, and find theroutes.yamlfile inside of it. Upload this file to Ghost Admin>Labs>Routes. - Review the rest of the Ghost Admin>Labs>Members settings, except for Email settings. We’ll come back to this one.
- If I’m missing a step or you get stuck, tweet me @elijahmurray
Manage your domain with Route53 in AWS
In order to have a custom domain with AWS, you need to setup a custom domain in AWS’s domain management tool, Route53. Depending on where you you bought your domain, these settings might be a little different.
Generally you can Google, “how to setup Route53 with MY_DOMAIN_REGISTRAR”. I recommend Namecheap personally, as I’ve found them the easiest to work with.
Setup Elastic IP Address
First, we need to setup an elastic IP. I could get into explaining what and why you need an elastic IP buuuuut, just go Google it if you’re curious.
- Within AWS, on the left hand panel under “Network & Security” click “Elastic IPs”
- Click, “Allocate Elastic IP Address”
- Leave everything as default, and click “Allocate”
- With your newly minted Elastic IP selected, in the top right click Actions>Associate Elastic IP address
- Resource type: Instance
- Instance: click into field, and select your Instance from the dropdown (this is the EC2 Instance that we created earlier)
- Skip the rest and click, “Associate”
- Confirm your Elastic IP address is working by going to the IP address listed in the, “Public IPv4 address” column. If your site loads, it’s working. If not, tweet at me @elijahmurray or cry
- Save this Elastic IP address for easy access, as it’s needed in the next step
Setup Custom Domain
- Open Route53 in AWS (Services in the top left, and then type Route53)
- Click “Create Hosted Zone”
- Type your custom domain in the Domain Name (type it naked, as in mysite.com, not www.mysite.com)
- Click “Create”
- Click into your newly created Hosted Zone (it’ll show up as your URL in the left panel)
- You’ll see two records by default, a NS and a SOA.
- Use the NS (Name Server) records to configure your registrar with Custom DNS settings. If you get stuck on this, google it. Each Registrar is slightly different, but it should be well documented unless you have a shitty registrar. Here’s how to do it for Namecheap
- Lastly, let’s connect our IP address to our new domain. Click “Create Record Set”
- Name: leave blank
- Type: A
- Value: paste in your Elastic IP address
- Click “Create”
- And let’s make sure it works for the www.mysite.com address as well…Click “Create Record Set”
- Name: www
- Type: A
- Value: paste in your Elastic IP address
- Click “Create”
- Confirm your handiwork by visiting your custom domain (i.e. mysite.com AND www.mysite.com). If your site loads, the custom domain is working. Everyone says, “this can take up to 24 hours”. In my experience, it’s live within 5-10 minutes.
- Extra help: A Namecheap / AWS tutorial with pics
Setting up email and Mailgun
There are two places that you need to configure your Mailgun account. This is not intuitive in the Ghost documentation.
This is because the mailgun settings within the Ghost Admin portal are for transactional emails, specifically newsletter emails, and the other settings are for sign in/sign up emails. Luckily I struggled with this so you don’t have to.
Creating a Mailgun Account
- Create a mailgun account with your credit card
- Credit card verify your account (this is stupid but important they don’t charge anything as far as I can tell, but do it “to prevent spammers” 🙄)
- Email verify your account
- Note, if you aren’t setting up a custom domain you’ll need to add your test email address to mailgun (i.e. the email you’re entering within your website as a test). You do this by adding an Authorized Recipients within Mailgun. Read here.
- Click “Add New Domain” on the Domains page
- Set the Domain name to your domain, but add
mgin front of your URL (i.e. “mg.mysite.com”), and click “Add Domain”. Themgsubdomain is a best practice, but not necessary. - Back within AWS’s Route53, create the records as outlined in Mailgun from the above step.
- 2 TXT records, 2 MX records, and 1 CNAME record. Note: When setting the MX records in Route53, set the value to be “10 mxa.mailgun.org” and “10 mxb.mailgun.org”. This is how Route53 accepts the Priority field.
- Click “Verify DNS Settings”. Again, they say 24 hours, but this was live as soon as I finished creating the DNS records for me.
- If you have questions on mailgun, don’t tweet at me.
Update Ghost Admin configs for mail
- With Ghost Admin, go back to Settings>Lab>Members and expand the Email settings
- Mailgun domain: type in your custom domain (i.e. “mg.mysite.com”)
- Mailgun API key: click “Find your Mailgun API keys here”, and copy and paste your private API key
- Hit save
Update SMTP settings for mailgun
-
Get and save for later your SMTP Settings from Mailgun to the side
- Within Mailgun, go to Sending>Domain Settings
- Make sure your custom domain is selected in the top left dropdown
- Copy the Login (starts with
postmaster@……) - Click “reset password” and copy the password when it’s shown to you
- Save the user and password for later
-
Using the keypair that we downloaded during the Instance setup (way back when), SSH into the Instance from your Terminal. Make sure to not copy pasta “mysite.com”, and update it to be your custom domain.
ssh -i "mysite-keypair.pem" bitnami@mysite.com
-
Open and edit
/opt/bitnami/apps/ghost/htdocs/config.production.json. You’ll need to usenanoorvimto edit the file on the server. Your on your own for this, but google “vim” and follow the instructions veeeery slowly. -
Replace the
"mail"section in theconfig.production.jsonfile with the below:"mail": { "transport": "SMTP", "options": { "service": "Mailgun", "auth": { "user": "postmaster@example.mailgun.org", "pass": "1234567890" } } } -
Make sure to set the
"user"and"pass"fields to what the values you got from Step 1 -
Save and close the file
-
Restart
ghostandapacheby running the below commands, one after another:-
sudo /opt/bitnami/ctlscript.sh restart ghost
sudo /opt/bitnami/ctlscript.sh restart apache
-
-
Confirm everything worked. You should now be able to go to your website and subscribe. You should receive an email from your site to confirm your subscription.
-
Additionally, once you’re subscribed, create a new post and publish it as a newsletter and confirm you should be able to create a new post, and publish it as a newsletter to confirm you receive the post in your inbox. Instructions on how to do this if you’re out of the loop
Sheeeeesh that was exhausting to write. Hopefully you found it helpful! If you want to support me, consider signing up for my personal growth newsletter, gritlist.co, where I send helpful tactics emails out once a week.
Or if you’re not interested in personal growth, consider subscribing or following me on Twitter.
Any questions? Tweet me.
Bonus: Disable bitnami banner
Bitnami has a stupid banner when you install it. To remove it:
-
SSH in to your instance, and run:
-
sudo /opt/bitnami/apps/ghost/bnconfig --disable_banner 1
Bonus: Setup SSL / HTTPS for free
If you want to go the extra mile and setup SSL, don’t try going through the integrations for Let’s Encrypt / SSL on Ghost’s marketplace. It didn’t work. Instead, do the following:
-
SSH in to your instance, and run:
-
sudo /opt/bitnami/bncert-tool -
Follow the prompts from the script
-
Once the script is finished, update the url attribute in
/opt/bitnami/apps/ghost/htdocs/config.production.jsonto be:"url": "https://www.mysite.com" -
Update apache to prevent an infinite redirect. Open
/opt/bitnami/apache2/confi/httpd.conf- Search the file for
ServerNameand add the following line just above it: RequestHeader set X-Forwarded-Proto "https"(source)
- Search the file for
-
Restart
ghostandapacheby running:sudo /opt/bitnami/ctlscript.sh restart ghost sudo /opt/bitnami/ctlscript.sh restart apache - Confirm it’s working. Now if you visit your site, you should be redirected to
https://www.mysite.comevery time. - It might take a bit for the SSL to update. You can try a different browser if it’s not working right away, as some times the DNS gets cached.
 @elijahmurray